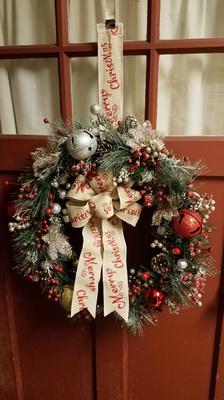
Merry Christmas Burlap Wreath
by Rachelle Kane
(Pennsylvania)
Hi there, I recently have been on a crafting warpath. I have painted everything possible for now ,so.....Tis' the season to make some wreaths!
This particular wreath is a gift to my soon to be mother-in-law. She requested that I make her a new Christmas wreath for her front door, but she needed it very quickly. So, I gladly excepted the challenge. I began with a quick shopping trip to Lowes/Walmart/Micheals. Since this wreath will see some weather, I chose a grapevine wreath (18 inch). Remember guys and gals, your wreath will grow significantly with decor. I also purchased silver dusted pine,snow dusted cranberries, gold and white dusted pine cones,large jingle bells (in gold silver and red),gold poinsettias,small and large bulbs (in red,silver and gold),lastly Merry Christmas burlap ribbon. I wanted to make this wreath within a 2 day period so I didn't have time to "shop around for best prices" So, I spent approximately $65 on all materials. The grapevine wreath was almost half of the cost, so not to bad. I began by hot gluing the pine around the wreath. Then I placed all of the smaller items, like the silver ,red,and gold ball branches throughout. Very sporatic, just filling in the spaces. Next, I like alot of cranberries...small ,large,snow covered,etc. So that was my next step. Finishing the wreath up with the larger items. Like the gold poinsettas,pine cones,bulbs,and jingle bells.
I got myself a spool of wired ,2 1/2 in x 12 ft burlap ribbon to create the bow and the hanging strap. I created the bow using the 7 loop method and wrapped the center with wire. that will go very last,set aside for now. Next, is the hanging strap. Which is 36 inches long. Choose where you would like the top center of your wreath to be, and wrap the ribbon under all decor right against the grapevine. Pull even and overlap about 2 inches,and staple, for now. Next cut a small 1 inch slit across for the door wreath hanger to come thru.Grab your glue gun and glue the 2 peices together all the way down to the top of wreath. This will enforce the strength of your strap, and will be sure to withhold the weight of our wreath. You can remove your 2 staples now. My sewing machine is down or I would have sewed a few darts around the 1 inch opening . Lastly, take a piece of wire twice as long as your wreath. feed it thru the right side thru the center and out the left side of your wreath. Pull till equal excess on either side. You should have enough to wrap around the left and ride sides,twice. and just weave the end back into the grapevines. This will create a space for your beautiful bow to hang in the center of your wreath. Last step, is to take some thin wire and feed through the already existing wire on the back of your ribbon. Twist the ends very tightly around the horizontal wire running through the wreath. Voila!!! Fluff your bow to your liking and hang on your wall,wreath hanger,or pull end of strap to top ledge of your front door and enforce with a few thumb tacks.
I hope you love it as much as I do, Thank you for your interest.
Happy Holidays and God Bless!!
Back to Top


